Encoders
What Are Encoders?
Very commonly in FTC®, you want to know where something is. Whether that is how many times your drivetrain wheel has rotated, what angle your arm is at, or how far your string slides have gone, rotational encoders can help you. In FTC, an encoder refers to any sensor that tracks the rotational angle of a mechanism.
There are two types of encoders commonly used in FTC, relative and absolute encoders. Relative encoders are the ones covered here as they are the more common type.
Relative Encoders
Ranging from the built in encoder in every FTC legal motor to common external encoders like the REV Through Bore encoder, these encoders track the relative position of the shaft or mechanism they are attached to. What this means is that the position output is relative to the initial position at robot power on, meaning position information is lost between power cycles.
Tip
Relative encoders don’t reset to zero at the beginning of OpModes! You can use STOP_AND_RESET_ENCODERS to ensure that your encoders are always at zero at the beginning of an OpMode (see below).
All relative encoders in FTC use the “quadrature” protocol to send position information to the expansion hub. As a result, relative encoders must be plugged into the encoder ports located near the motor ports in order to function.
Terminology
Count: A “count” (sometimes referred to as a “tick”) refers to one increment of the encoder’s position. Relative encoders report their position as a number equal to the number of “ticks” or “counts” the encoder has moved from its starting angle.
Counts Per Revolution: The number of “counts” that an encoder reports after it has gone exactly one revolution. This value is commonly used to convert encoder “counts” into degrees or revolutions.
Warning
Quadrature terminology can get very confusing! Some encoders may report “pulses per revolution.” One pulse can either equal 1 or 4 counts. Other encoders may report “cycles per revolution”, which confusingly have the same acronym as counts per revolution. The best way to check is to plug the encoder into the REV Hub and turn it 1 full revolution, then check what it reports.
Programming Encoders
Reading Encoders
In FTC software, quadrature encoders and motors are accessed with the same motor object. What this means is that we can access an encoder’s position like so:
int position = motor.getCurrentPosition();
While convenient if one uses the built-in motor encoder, this can easily become confusing if using external encoders. To use external encoders, you must use the motor object associated with the port. For example, if there is a motor in port 1 named “Arm Motor” and an external encoder plugged into encoder port 1, you must do the following to get the encoder’s position:
DcMotor motor = hardwareMap.dcMotor.get("Arm Motor");
double position = motor.getCurrentPosition();
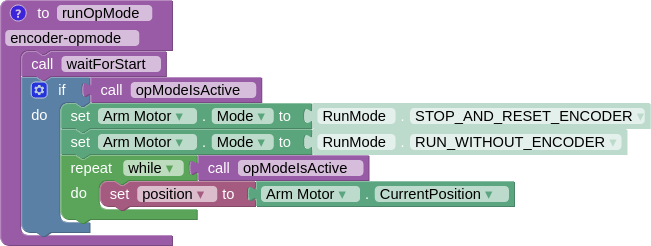
Great! We now have the relative position of our encoder, reported in the number of “counts” it is from what it considers to be zero. However, it is often convenient to have the encoder start at zero at the beginning of the OpMode. While it technically does not change anything, it can help with debugging and simplify future code. To do this, we can add a call to reset the encoders before we read them.
DcMotor motor = hardwareMap.dcMotor.get("Arm Motor");
motor.setMode(DcMotor.RunMode.STOP_AND_RESET_ENCODER); // Reset the motor encoder
motor.setMode(DcMotor.RunMode.RUN_WITHOUT_ENCODER); // Turn the motor back on when we are done
int position = motor.getCurrentPosition();
As a note, RUN_WITHOUT_ENCODER does not disable the encoder. It instead tells the SDK not to use the motor encoder for built-in velocity control. We will go over what this means in a later section, but for now, know that it turns the motor back on so we can use it after the encoder is reset.
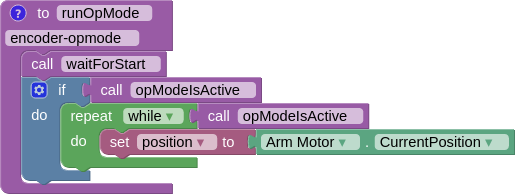
Now we have our position (in counts) relative to the starting angle of the encoder. We can make a quick program to see this in action. Here, we use a motor encoder plugged into a port named “Arm Motor” in the hardware configuration.
package org.firstinspires.ftc.teamcode;

import com.qualcomm.robotcore.eventloop.opmode.LinearOpMode;
import com.qualcomm.robotcore.eventloop.opmode.TeleOp;
import com.qualcomm.robotcore.hardware.DcMotor;
@TeleOp
public class EncoderOpmode extends LinearOpMode {
    @Override
    public void runOpMode() throws InterruptedException {
        // Find a motor in the hardware map named "Arm Motor"
        DcMotor motor = hardwareMap.dcMotor.get("Arm Motor");

        // Reset the motor encoder so that it reads zero ticks
        motor.setMode(DcMotor.RunMode.STOP_AND_RESET_ENCODER);

        // Turn the motor back on, required if you use STOP_AND_RESET_ENCODER
        motor.setMode(DcMotor.RunMode.RUN_WITHOUT_ENCODER);

        waitForStart();

        while (opModeIsActive()) {
            // Get the current position of the motor
            int position = motor.getCurrentPosition();

            // Show the position of the motor on telemetry
            telemetry.addData("Encoder Position", position);
            telemetry.update();
        }
    }
}

If you run the above OpMode and turn the encoder, you should see the values change as you move. If you rotate the shaft back to where it started, you will see the number return to (very close to) zero. As an exercise, rotate the shaft one full revolution (360) degrees and note down the number.
There is one more thing we can do with encoders. While knowing the number of counts something moved is useful, oftentimes one will need a different number, like the number of revolutions the encoder has turned or the angle it is at. To determine these, we need a constant, the encoders Counts Per Revolution or CPR. For external encoders, this number is often provided in a datasheet. For motors, it will generally be on the product page, although some motors (most notably the Rev Ultraplanetary Gearbox) do not provide it plainly.
Tip
You can calculate a motor’s Counts Per Revolution by taking the base motor’s Counts Per Revolution and multiplying it by the gearbox ratio. Be careful to use the actual gearbox ratio when doing this! For example, a 5:1 Ultraplanetary motor would have a count per revolution of 28 * (5.23) = 146.44 because the base motor has 28 Counts Per Revolution and the 5:1 gearbox actually has a 5.23:1 gear ratio. Remember, when using two gearboxes on top of each other, you multiply the gear ratios together.
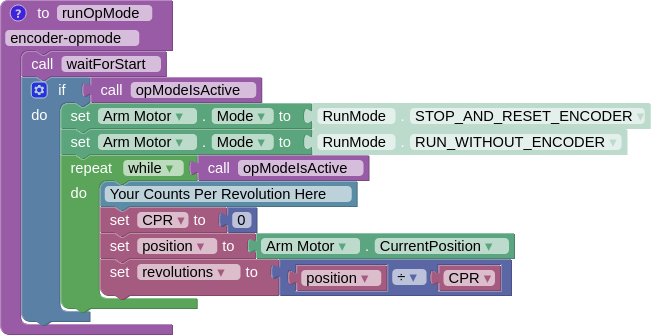
In the following example, we divide the encoder position by its counts per revolution to obtain the number of revolutions the encoder has rotated. You have to replace [Your Counts Per Revolution Here] with the counts per revolution of your motor, found on its product page or calculated using the above tip.
double CPR = [Your Counts Per Revolution Here];

int position = motor.getCurrentPosition();
double revolutions = position/CPR;
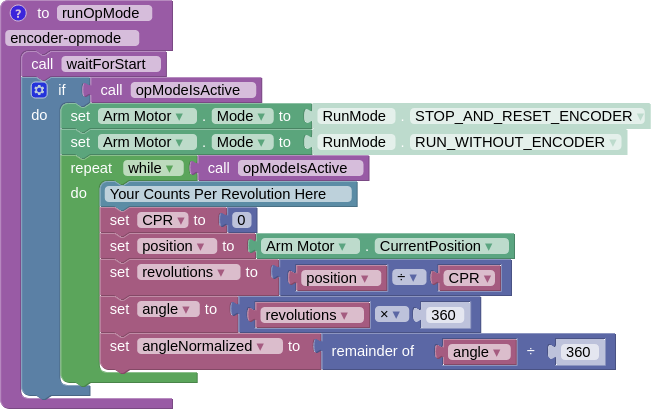
There is one more number we can get: the angle of the shaft. Calculating this number is very simple. We can multiply the number of rotations by 360 (since there are 360 degrees in one revolution). You might notice that this number can go above 360 as the shaft rotates multiple times. As such, we introduce angleNormalized, which will always be between 0 and 360.
double CPR = [Your Counts Per Revolution Here];

int position = motor.getCurrentPosition();
double revolutions = position/CPR;

double angle = revolutions * 360;
double angleNormalized = angle % 360;
Putting it all together, we get the following testing program.
package org.firstinspires.ftc.teamcode;

import com.qualcomm.robotcore.eventloop.opmode.LinearOpMode;
import com.qualcomm.robotcore.eventloop.opmode.TeleOp;
import com.qualcomm.robotcore.hardware.DcMotor;
@TeleOp
public class EncoderOpmode extends LinearOpMode {
    @Override
    public void runOpMode() throws InterruptedException {
        // Find a motor in the hardware map named "Arm Motor"
        DcMotor motor = hardwareMap.dcMotor.get("Arm Motor");

        // Reset the motor encoder so that it reads zero ticks
        motor.setMode(DcMotor.RunMode.STOP_AND_RESET_ENCODER);

        // Turn the motor back on, required if you use STOP_AND_RESET_ENCODER
        motor.setMode(DcMotor.RunMode.RUN_WITHOUT_ENCODER);

        waitForStart();

        while (opModeIsActive()) {
            double CPR = [Your Counts Per Revolution Here];

            // Get the current position of the motor
            int position = motor.getCurrentPosition();
            double revolutions = position/CPR;

            double angle = revolutions * 360;
            double angleNormalized = angle % 360;

            // Show the position of the motor on telemetry
            telemetry.addData("Encoder Position", position);
            telemetry.addData("Encoder Revolutions", revolutions);
            telemetry.addData("Encoder Angle (Degrees)", angle);
            telemetry.addData("Encoder Angle - Normalized (Degrees)", angleNormalized);
            telemetry.update();
        }
    }
}

Tracking Wheels and Spools
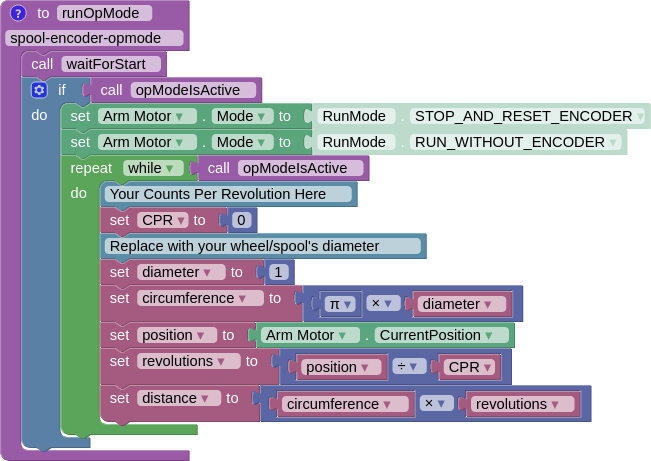
Up to this point, we have mostly been working with motors rotating something. However, many mechanisms in FTC are linear, and it can be desirable to measure these in a linear unit as well. Fortunately, this is very straightforward. All we need to know is the diameter of the object we are measuring.
Be careful when selecting your diameter. For wheels, it is the outer diameter of the wheel, but for spools, it is the inner diameter of the spool, where the string rests. For chain and belts, it is the “pitch diameter” of the sprocket or pulley.
From here, we can calculate the circumference (the length of the arc of the circle, or the distance the wheel/spool will travel in one rotation)
double diameter = 1.0; // Replace with your wheel/spool's diameter
double circumference = Math.PI * diameter;

double distance = circumference * revolutions;
Note
Units are very important when dealing with FTC programming, so make sure they are always consistent! Whatever units you use for the diameter are the units for your calculated distance. So if you measure your diameter in inches, the reported distance will also be in inches.
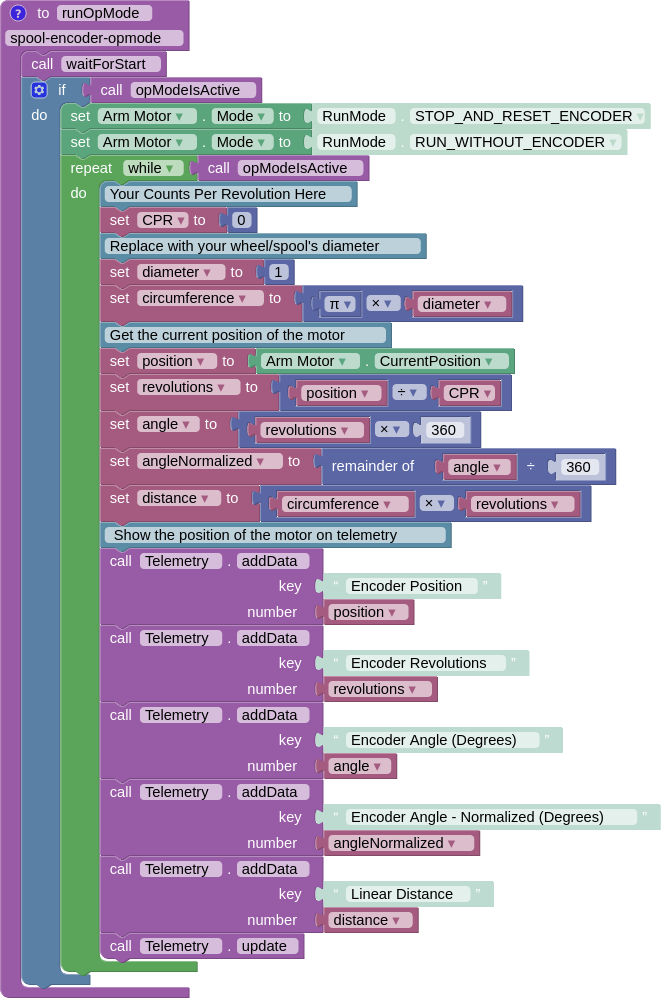
Putting this all together with our previous testing program, we get
package org.firstinspires.ftc.teamcode;

import com.qualcomm.robotcore.eventloop.opmode.LinearOpMode;
import com.qualcomm.robotcore.eventloop.opmode.TeleOp;
import com.qualcomm.robotcore.hardware.DcMotor;
@TeleOp
public class SpoolEncoderOpmode extends LinearOpMode {
   @Override
   public void runOpMode() throws InterruptedException {
      // Find a motor in the hardware map named "Arm Motor"
      DcMotor motor = hardwareMap.dcMotor.get("Arm Motor");

      // Reset the motor encoder so that it reads zero ticks
      motor.setMode(DcMotor.RunMode.STOP_AND_RESET_ENCODER);

      // Turn the motor back on, required if you use STOP_AND_RESET_ENCODER
      motor.setMode(DcMotor.RunMode.RUN_WITHOUT_ENCODER);

      waitForStart();

      while (opModeIsActive()) {
            double CPR = [Your Counts Per Revolution Here];

            double diameter = 1.0; // Replace with your wheel/spool's diameter
            double circumference = Math.PI * diameter;

            // Get the current position of the motor
            int position = motor.getCurrentPosition();
            double revolutions = position/CPR;

            double angle = revolutions * 360;
            double angleNormalized = angle % 360;

            double distance = circumference * revolutions;

            //Show the position of the motor on telemetry
            telemetry.addData("Encoder Position", position);
            telemetry.addData("Encoder Revolutions", revolutions);
            telemetry.addData("Encoder Angle (Degrees)", angle);
            telemetry.addData("Encoder Angle - Normalized (Degrees)", angleNormalized);
            telemetry.addData("Linear Distance", distance);
            telemetry.update();
      }
   }
}
Running Motors With Encoders
We’ve learned how to read encoder values, but how do you set where you want to go and tell the motor to go there?
Earlier, we learned about the RUN_WITHOUT_ENCODER mode for the motor. We can use another motor mode, RUN_TO_POSITION, to tell the motor to run to a specific position in ticks, like so:
DcMotor motor = hardwareMap.dcmotor.get("Arm Motor");
motor.setMode(DcMotor.RunMode.RUN_TO_POSITION); // Tells the motor to run to the specific position
Tip
You can find out more about run modes at the official REV Robotics Documentation page
However, before we tell the motor to go to a position, we have to tell the motor what position to run to. Note that this value must be an integer. Let’s amend the above code to do that.
Warning
Setting the motor to RUN_TO_POSITION mode before setting a target position will throw an error. Be careful not to do that!
DcMotor motor = hardwareMap.dcmotor.get("Arm Motor");
int desiredPosition = 1000; // The position (in ticks) that you want the motor to move to
motor.setTargetPosition(desiredPosition); // Tells the motor that the position it should go to is desiredPosition
motor.setMode(DcMotor.RunMode.RUN_TO_POSITION);
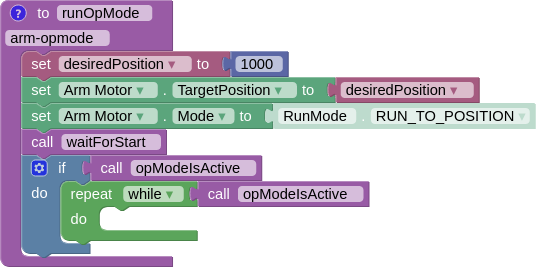
This code tells the motor to move to 1000 ticks, using a PID loop to control the motor’s position. You can read more about PID loops here.
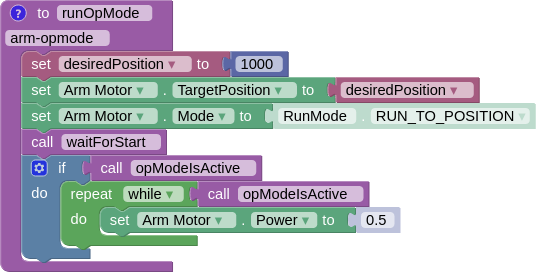
We can cap the speed that the motor runs at using the following code:
DcMotor motor = hardwareMap.dcmotor.get("Arm Motor");
int desiredPosition = 1000; // The position (in ticks) that you want the motor to move to
motor.setTargetPosition(desiredPosition); // Tells the motor that the position it should go to is desiredPosition
motor.setMode(DcMotor.RunMode.RUN_TO_POSITION);
motor.setPower(0.5); // Sets the maximum power that the motor can go at
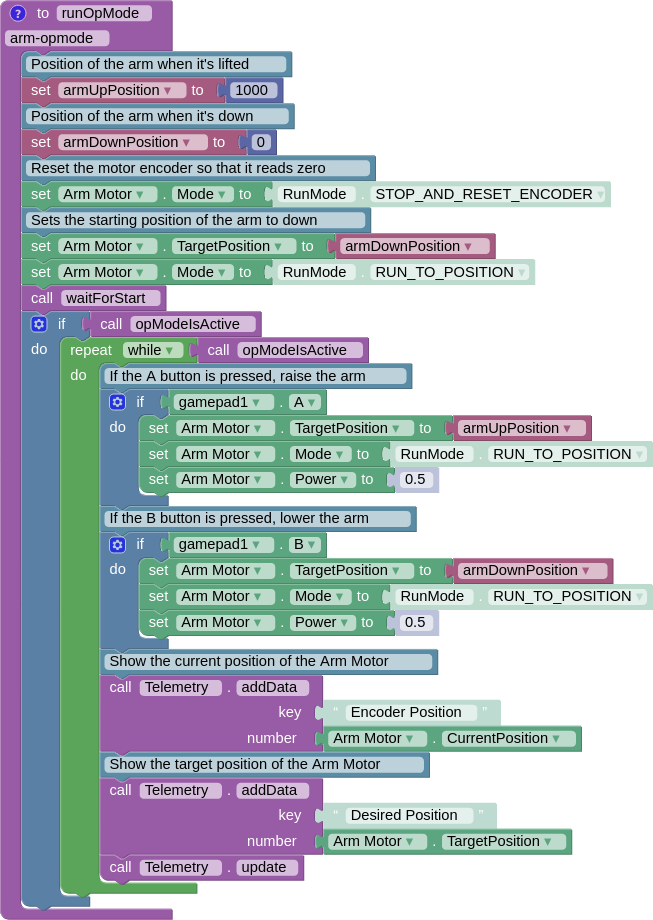
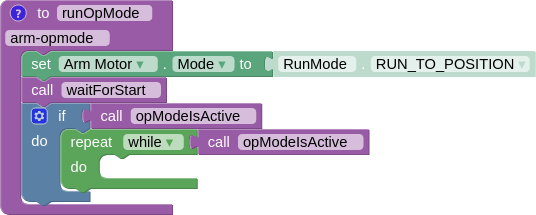
Now, let’s use this information to control an arm in an OpMode.
package org.firstinspires.ftc.teamcode.Tests;

import com.qualcomm.robotcore.eventloop.opmode.LinearOpMode;
import com.qualcomm.robotcore.eventloop.opmode.TeleOp;
import com.qualcomm.robotcore.hardware.DcMotor;

@TeleOp
public class ArmOpMode extends LinearOpMode {
   @Override
   public void runOpMode() throws InterruptedException {
      // Position of the arm when it's lifted
      int armUpPosition = 1000;

      // Position of the arm when it's down
      int armDownPosition = 0;

      // Find a motor in the hardware map named "Arm Motor"
      DcMotor armMotor = hardwareMap.dcMotor.get("Arm Motor");

      // Reset the motor encoder so that it reads zero ticks
      armMotor.setMode(DcMotor.RunMode.STOP_AND_RESET_ENCODER);

      // Sets the starting position of the arm to the down position
      armMotor.setTargetPosition(armDownPosition);
      armMotor.setMode(DcMotor.RunMode.RUN_TO_POSITION);

      waitForStart();

      while (opModeIsActive()) {
            // If the A button is pressed, raise the arm
            if (gamepad1.a) {
               armMotor.setTargetPosition(armUpPosition);
               armMotor.setMode(DcMotor.RunMode.RUN_TO_POSITION);
               armMotor.setPower(0.5);
            }

            // If the B button is pressed, lower the arm
            if (gamepad1.b) {
               armMotor.setTargetPosition(armDownPosition);
               armMotor.setMode(DcMotor.RunMode.RUN_TO_POSITION);
               armMotor.setPower(0.5);
            }

            // Get the current position of the armMotor
            double position = armMotor.getCurrentPosition();

            // Get the target position of the armMotor
            double desiredPosition = armMotor.getTargetPosition();

            // Show the position of the armMotor on telemetry
            telemetry.addData("Encoder Position", position);

            // Show the target position of the armMotor on telemetry
            telemetry.addData("Desired Position", desiredPosition);

            telemetry.update();
      }
   }
}